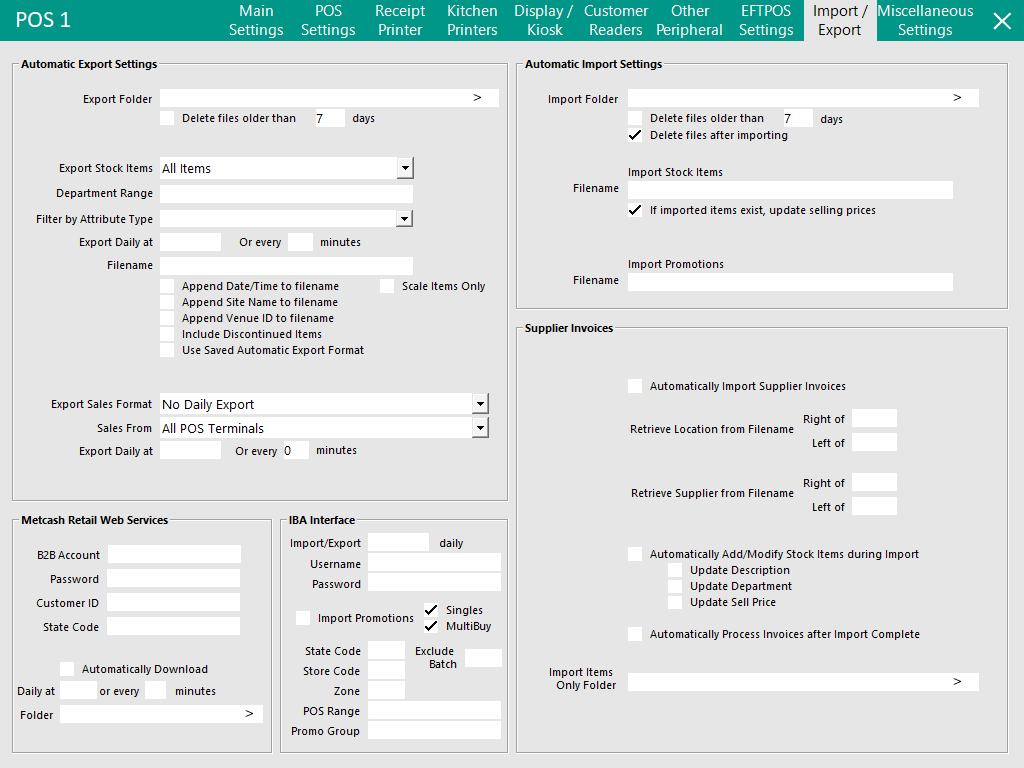
The Import/Export tab is used for configuring the Importing and Exporting of data from the current POS Terminal/Back Office.
This tab contains numerous sections with various settings to customise the way data is exported.
To skip to a particular section or a particular setting, click on one of the following links:
This function allows for a large amount of Stock Items and Stock Item Sales to be automatically exported for use in third-party applications that require the data.
You have the option of grouping the sales data from ‘All POS Terminals’, ‘This POS Only’ and ‘This Site Only’.
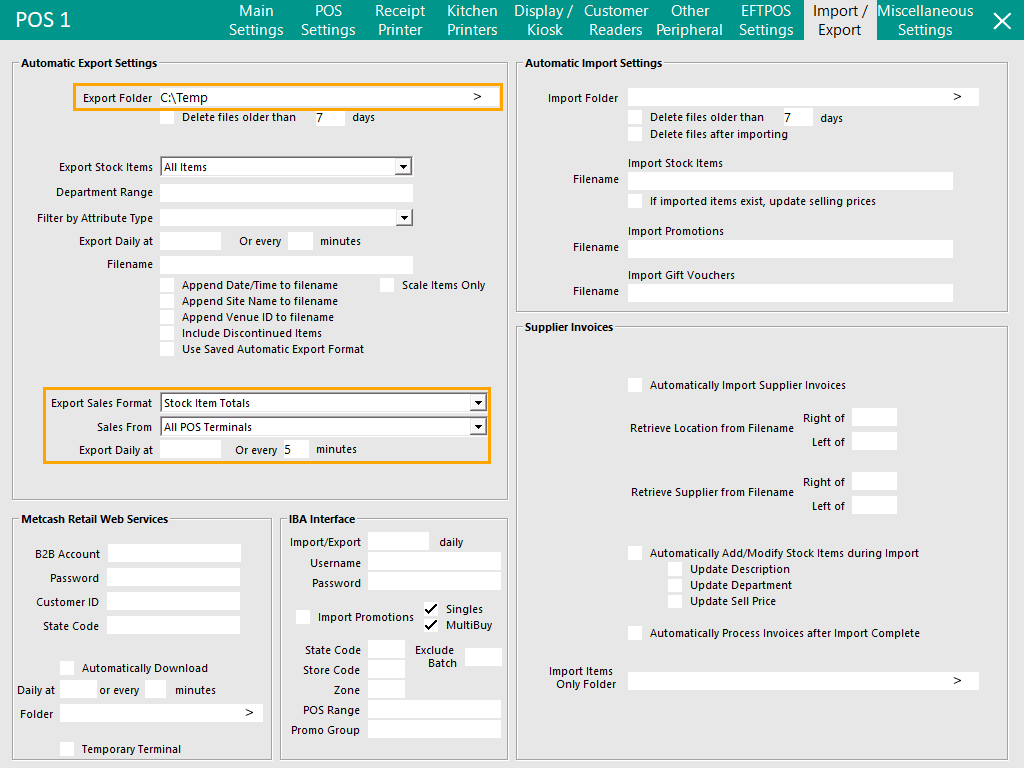
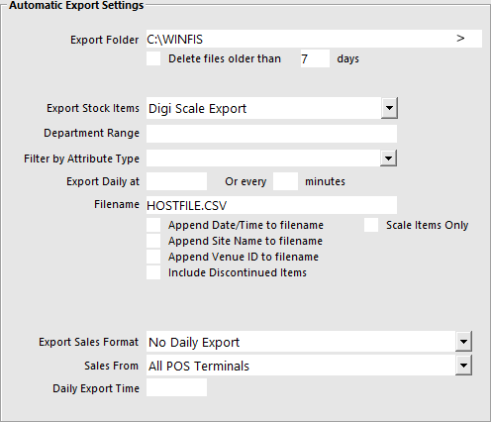
Go to: Setup > POS Terminals > Modify > Import/Export > Automatic Export Settings.
Browse to a location on your network or PC where you would like the export to be saved to.
Select if you want the files to be deleted automatically after a set period of days.
All Items – Will export all stock items to a file.
New Items Only – Will export all new stock items since the last export to a file.
New and Modified Items Only – Will export all new and modified items since the last export to a file.
Ishida ScaleLink Export – Will export the fields required for the Ishida scale labels. When selecting this option, a Price Level field is displayed which can be used to set the Price Level to use when generating the Export File for Ishida ScaleLink.
Digi Scale Export - This function enables all new and modified items to be exported to a Digi Scale Software format.
Webstore Items Only - This function will only export Stock Items that have the "Web Store" checkbox enabled in the Stock Item under "Other Options".
Avery Berkel Export - This function will export Stock Items in the Avery Berkel Export Format. This format also supports the exporting of Attribute Type "Best Before Days". For more information about configuring this format and the Attribute Type, click here.
Enter the department ranges you want (e.g. 1-3, 5, 7-12).
Select an Attribute Type that you want to export (e.g. Container Type, Country of Origin, Wine Varietal), or leave as blank to export all Attribute Types
Enter the time you want the stock items to be exported each day, or enter a number of minutes into the "or every # minutes" field to have the file exported using the entered interval.
Enter the name you want to use for the file once it has been exported.
You have the choice to add the Date/Time, Site Name and/or Venue ID to the filename.
Select this option to append the Date and Time to the end of the filename.
By enabling this option, each time Stock Item data is exported from Idealpos, the filename will be unique and previously exported data will not be overwritten, enabling you to open the export file for a specific date/time.
If the "Delete files older than # days" option is configured and enabled, exported data will be stored in the Export folder for the number of days that have been entered.
Select this option to append the Site Name to the filename.
The Site Name can be configured by going to: Back Office > Setup > Sites > Select Site from the list > Modify > Enter Site Name into the Description field.
The Site Name in this description field will be appended to the filename when the "Append Site Name to filename" is enabled.
Select this option to append the Venue ID to the filename.
The Venue ID is retrieved from the Venue ID field configured in Setup > Global Options > General > Venue ID.
Note that the Venue ID in Global Options is also used for Liquor File/Price Book, so if you decide to configure or modify this setting and you are also using the Liquor File or Price Book functionality, ensure that it won't clash with your Liquor File or Price Book.
Select the checkbox to Include Discontinued Items in the file.
Select the checkbox to use the Saved Automatic Export Format.
The Saved Automatic Export Format can be configured by going to Utilities > Export Data > Stock Items > Automatic Export Format.
Select this checkbox to only include Scale Items in your exported data.
The Scale checkbox in a Stock Item determines whether or not the Item is a Scale Item.
Go to: File > Stock Control > Stock Items > Open Item.
Toggling the Scale checkbox will control whether the item is a Scale Item.
The Stock Items screen can also be filtered by Scale Items by entering "Y" into the Scale column of the Stock Items search screen.
Use the drop down menu to select a format.
The following options are available from the dropdown box:
There are three different choices to choose from:
Enter the time (in 24 hour format) you want the export to take place each day, or enter a number of minutes into the "or every # minutes" field to have the file exported using the entered interval.
Note that all sales performed up to the time of the Export are included. The Export does not use the End of Day time to determine which sales to send.
If using the export every x minutes, ensure that the export daily at is set to blank, or if using export every x minutes, ensure export daily at is set to blank.
When exporting every x minutes, all the sales that were performed between the previous export and the next interval will be exported.
If sales do not take place between a period of time that spans the entire interval, then an export file will not be generated. Once sales do take place, they will be exported during the next interval.
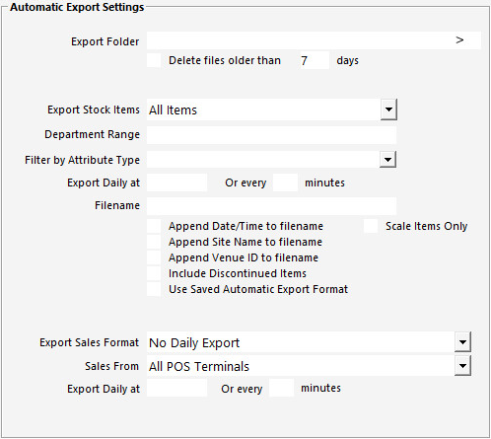
| Field # | Field Name | Field Description |
| 1 | Cons | This is an audit # which is unique for a transaction per POS terminal. |
| 2 | POS | This is the POS Terminal #. |
| 3 | Line | This is the Line number inside the transaction. The Combination of Cons, POS and Line will be unique across the whole system. |
| 4 | Date | Date/Time Stamp of the transaction. (dd MM yyyy HH:mm - e.g. 31 Aug 2012 13:51) |
| 5 | Stock Code | 16 character unique stock code |
| 6 | Text | Usually holds descriptor of stock item, occasionally with extra information |
| 7 | Price Level | Integer 0 to 12 - holding the price level the item was sold at |
| 8 | Item Qty | Quantity sold |
| 9 | Unit Price | Unit Price of item before any discounts applied. (Includes Tax if not Canada) |
| 10 | Amount | Total Price of items before any discounts applied. (Includes Tax if not Canada) |
| 11 | Tax Label | Usually GST or FRE |
| 12 | Tax Amount | Amount of Tax included in the Price |
| 13 | Discounted Amount | This is the actual Amount the items were sold for after the discounts were applied. |
| 14 | Cost | Average Cost Price of Stock Item at the time it was sold. |
| 15 | Site | Integer holding the Site or Store Code. |
| 16 | Location | Integer holding the Location or Area Code. E.g. Bottle Shop/Restaurant/Bar etc. |
| 17 | Customer | 10 character code indicating a Customer. This field can be empty. |
| 18 | Clerk | Integer holding the Clerk code that processed the transaction. |
| 19 | Department | Integer used to Group the Stock Items into particular departments. |
Below is a visual example of the text file that will be created by the export.
This format will export a ‘Stock Items’ file and a ‘Customers’ file.
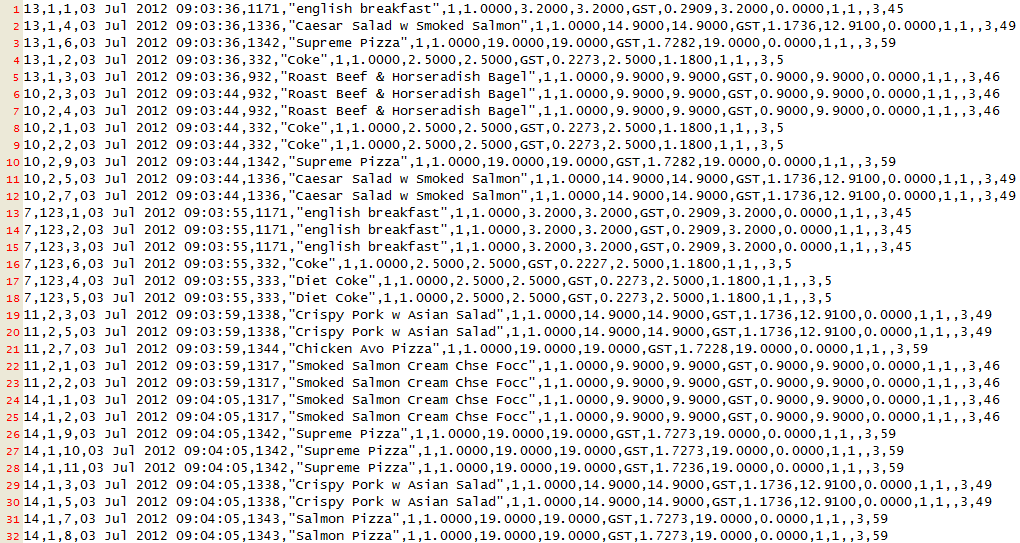
| Field # | Field Name | Field Description |
| 1 | AUDIT | This is an audit # which is unique for a transaction per POS terminal. |
| 2 | POS | This is the POS Terminal #. |
| 3 | LINE | This is the Line number inside the transaction. The Combination of Cons, POS and Line will be unique across the whole system. |
| 4 | DATE | Date/Time Stamp of the transaction. (dd MM yyyy HH:mm - e.g. 31 Aug 2012 13:51) |
| 5 | STOCKCODE | 16 character unique stock code |
| 6 | DESCRIPTION | Usually holds descriptor of stock item, occasionally with extra information |
| 7 | PRICELEVEL | Integer 0 to 12 - holding the price level the item was sold at |
| 8 | QUANTITY | Quantity sold |
| 9 | UNITPRICEBEFOREDISCOUNT | Unit Price of item before any discounts applied. (Includes Tax if not Canada) |
| 10 | TOTALPRICEBEFOREDISCOUNT | Total Price of items before any discounts applied. (Includes Tax if not Canada) |
| 11 | TAXLABEL | Usually GST or FRE |
| 12 | TAXAMOUNT | Amount of Tax included in the Price |
| 13 | DISCOUNTEDPRICE | This is the actual Amount the items were sold for after the discounts were applied. |
| 14 | COST | Average Cost Price of Stock Item at the time it was sold. |
| 15 | SITE | Integer holding the Site or Store Code. |
| 16 | LOCATION | Integer holding the Location or Area Code. E.g. Bottle Shop/Restaurant/Bar etc. |
| 17 | CUSTOMERCODE | 10 character code indicating a Customer. This field can be empty. |
| 18 | CLERK | Integer holding the Clerk code that processed the transaction. |
| 19 | DEPARTMENT | Integer used to Group the Stock Items into particular departments. |
Below is a visual example of the text file that will be created by the export.
This Export Sales Format can be used to export data in a format that can be imported into an Excel Spreadsheet and viewed as a Pivot Table.
To configure the Pivot Table Export, configure the Export Sales Format as follows:
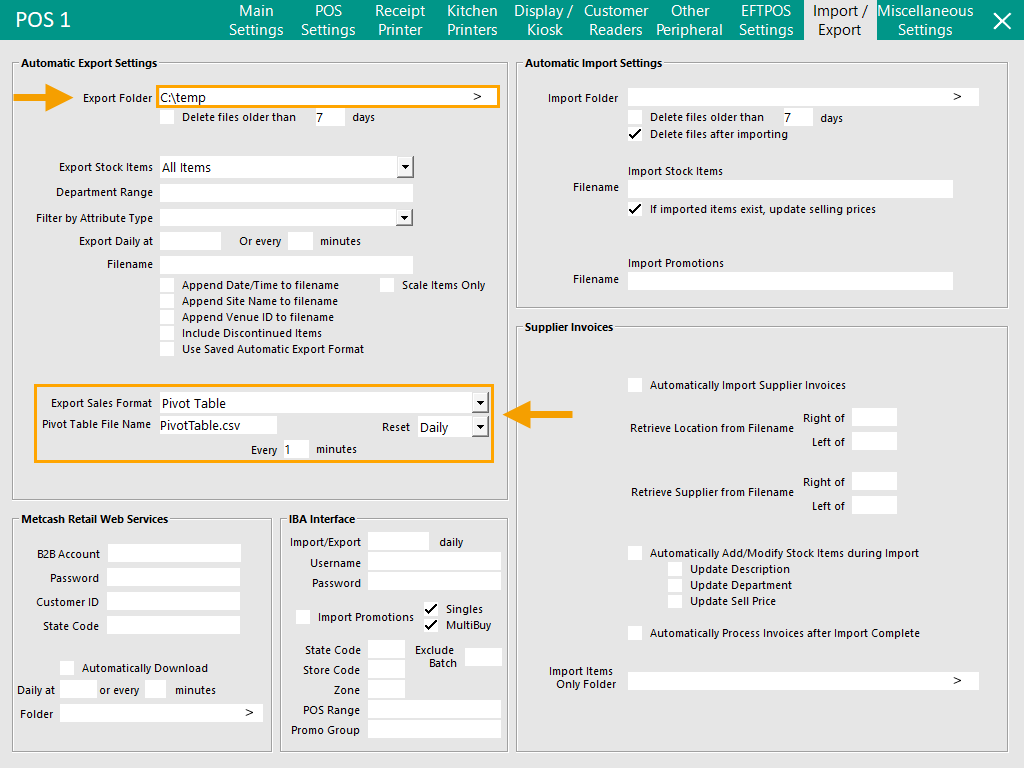
As the configuration and usage of the Pivot Table data in Excel is extensive, this is listed on a separate page.
Click here for information on how to configure the Pivot Table Data in Excel.
This Export Sales Format will export Sales Categories with Totals similar to the below example:
Company,SiteCode,SiteDescription,POSCode,POSDescription,SalesCategory,Quantity,NettEx,Tax,NettInc,Discounts,GrossInc
9999,91,ABC Coffee Co,1,POS Terminal 1,ACCESSORIES,2.0000,40.81,4.09,44.90,0.00,44.90
9999,91,ABC Coffee Co,1,POS Terminal 1,CONSUMABLES,1.0000,8.00,0.00,8.00,0.00,8.00
9999,91,ABC Coffee Co,1,POS Terminal 1,DRINKS & BEVERAGES,1.0000,4.82,0.48,5.30,0.00,5.30
9999,91,ABC Coffee Co,1,POS Terminal 1,FOOD,6.0000,70.36,7.04,77.40,0.00,77.40
9999,91,ABC Coffee Co,1,POS Terminal 1,ROASTED COFFEE,2.0000,59.50,0.00,59.50,0.00,59.50
9999,91,ABC Coffee Co,1,POS Terminal 1,TEA,1.0000,4.27,0.43,4.70,0.00,4.70
9999,91,ABC Coffee Co,1,POS Terminal 1,WET COFFEE,4.0000,20.09,2.01,22.10,0.00,22.10
To configure the Sales Categories Totals Export, configure the Export Sales Format as follows:
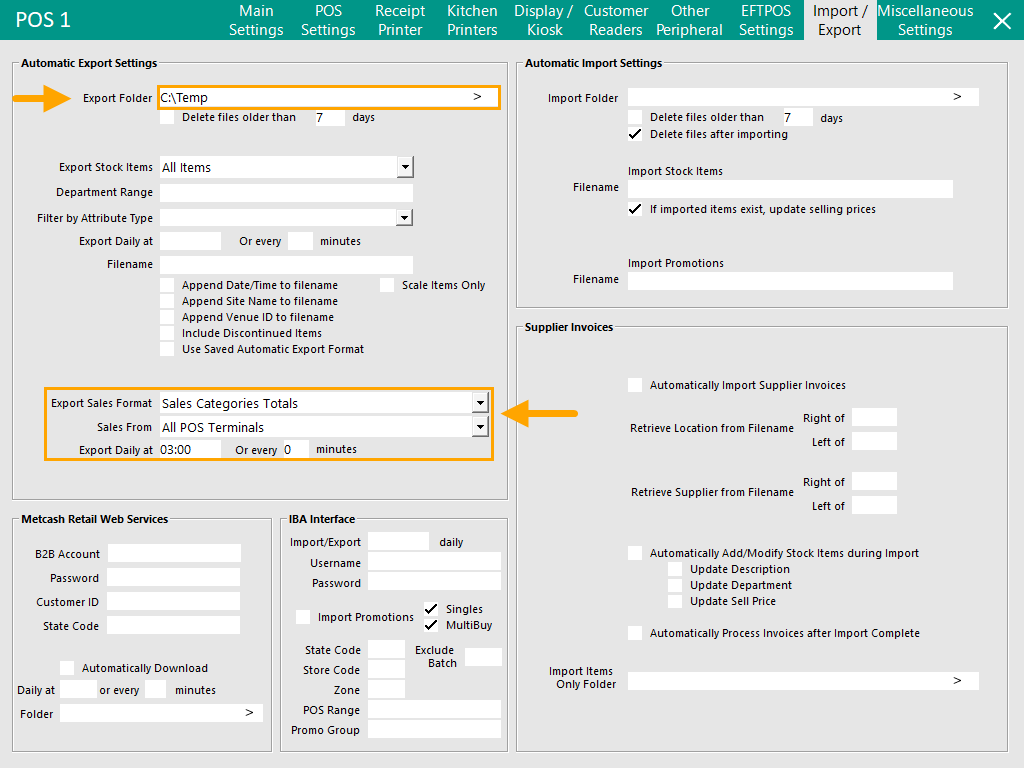
The Sales Categories Totals will be exported to the Export Folder path as per the Export Interval (Export Daily at or every # minutes).
Additional Notes for Export Format: Sales Categories Totals!
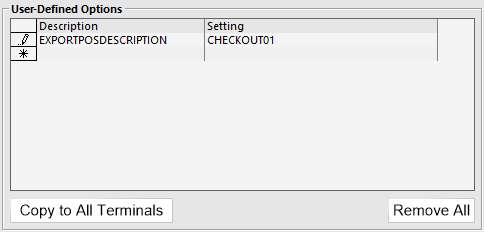
User-Defined Option to override POS Terminal Description
If a different POS Terminal Description is required in the Exported Data (compared to the standard POS Terminal Description that's configured in Back Office > Setup > POS Terminals), this can be set via a User-Defined Option.
Go to: Back Office > Setup > POS Terminals > Select the POS Terminal > Modify > POS Settings > User-Defined Options.
Create the following User-Defined Option:
Company Code in Exported Data
The Exported Data contains a Company field and the value used in the Company field is retrieved from Back Office > Setup > Global Options > General > Venue ID.
If the Venue ID is not set, a default value of 9999 will be included in the Company field of the data that is exported.

This Export Format will export using the same formatting as the Generic Sales Export, with the only difference being the forced file extension of CSV, as well as no spaces in the filename of the exported file.
To configure this Sales Export Format, select the following options:
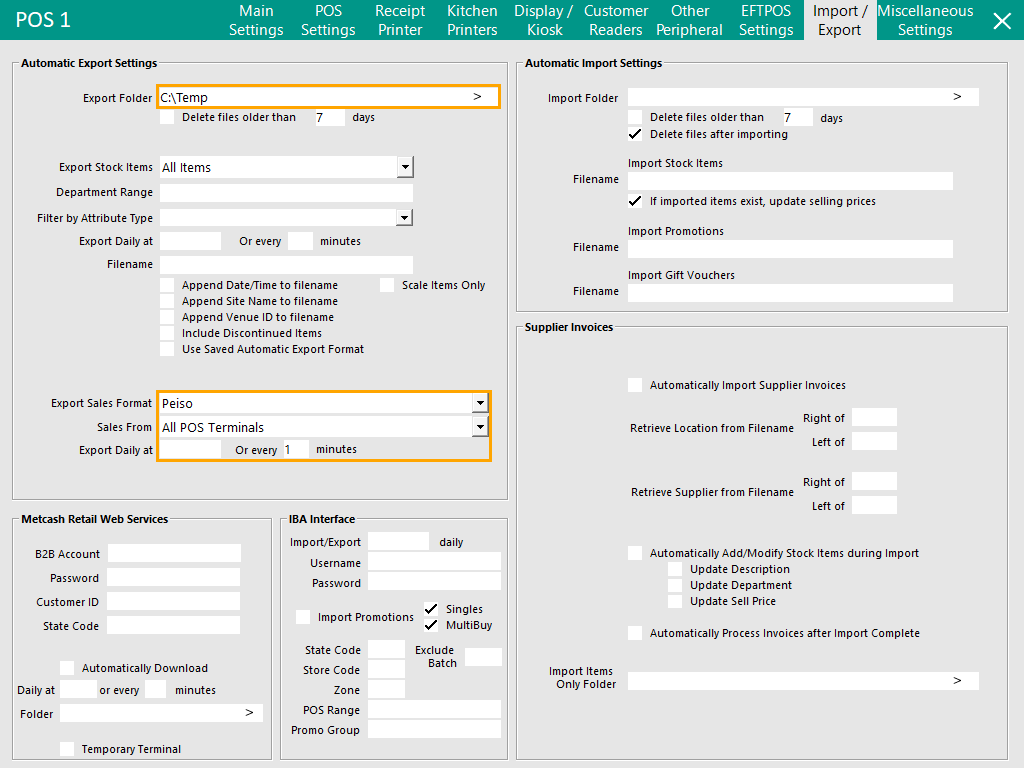
The Filename created by the export will be:
TradingName_YYYYMMDDHHMM.csv.
E.g. If the Trading Name is Idealpos User and the data is exported on the 18th June 2025 at 10:34AM, the resulting filename will be:
Idealposuser_202506181034.csv.
The below is a sample set of data that has bene exported using the Peiso format:
AUDIT,POS,LINE,DATE,STOCKCODE,DESCRIPTION,PRICELEVEL,QUANTITY,UNITPRICEBEFOREDISCOUNT,TOTALPRICEBEFOREDISCOUNT,TAXLABEL,TAXAMOUNT,DISCOUNTEDPRICE,COST,SITE,LOCATION,CUSTOMERCODE,CLERK,DEPARTMENT,REFERENCE
1263,"POS 1",1,18/06/2025 10:33,202001,"CAPPUCCINO",STANDARD,1.00,3.50,3.50,GST,0.32,3.50,0.29,Site 1,Location 1,,1,COFFEE,""
1263,"POS 1",2,18/06/2025 10:33,202002,"FLAT WHITE",STANDARD,1.00,3.50,3.50,GST,0.32,3.50,0.29,Site 1,Location 1,,1,COFFEE,""
1263,"POS 1",3,18/06/2025 10:33,202004,"SHORT BLACK",STANDARD,1.00,3.00,3.00,GST,0.27,3.00,0.20,Site 1,Location 1,,1,COFFEE,""
This Export Format will export Department Totals in a format similar to the example shown below:

The below is a text copy of the sample Exported Data shown in the above screenshot:
LOCATION,SALES_CATEGORY,DEPT_CODE,DEPARTMENT,SALES_QUANTITY,SALES_AMOUNT,PERCENTAGE,START_DATE,END_DATE,YEAR,WEEK_NUMBER
Site 1,BEVERAGE,202,COFFEE,12.0000,36.79,23.5700,2025-12-18 09:35:12,2026-01-08 14:03:37,2025,51
Site 1,RETAIL,303,ELECTRICAL APPLIANCES,0.0000,90.92,58.2500,2025-12-18 09:35:12,2026-01-08 14:03:37,2025,51
Site 1,GROCERIES,402,GROCERIES,2.0000,18.19,11.6500,2025-12-18 09:35:12,2026-01-08 14:03:37,2025,51
Site 1,MISCELLANEOUS,1001,MISCELLANOUS,1.0000,10.18,6.5200,2025-12-18 09:35:12,2026-01-08 14:03:37,2025,51
To configure and use the Department Totals Export, configure as follows:

The Automatic Export will be triggered as per the Export Daily at time/or every # minutes.
An export file will be produced as per the example shown above.
This Export Format will export Department Totals in a format similar to the example shown below:
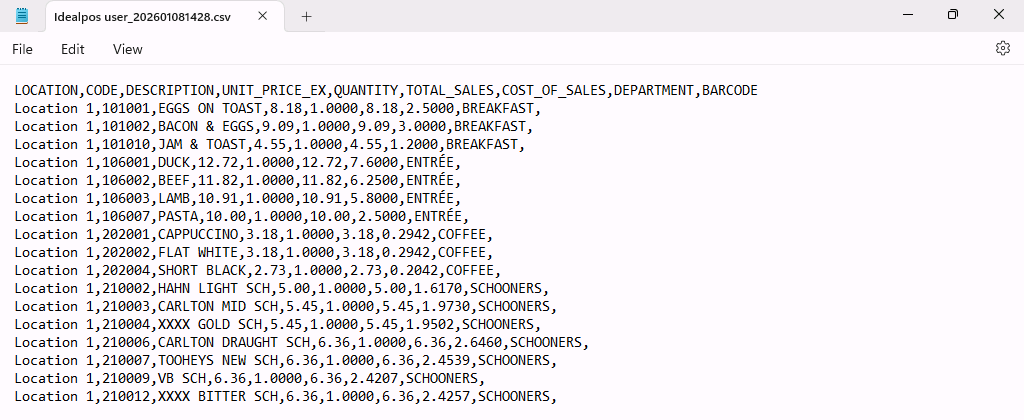
The below is a text copy of the sample Exported Data shown in the above screenshot:
LOCATION,CODE,DESCRIPTION,UNIT_PRICE_EX,QUANTITY,TOTAL_SALES,COST_OF_SALES,DEPARTMENT,BARCODE
Location 1,101001,EGGS ON TOAST,8.18,1.0000,8.18,2.5000,BREAKFAST,
Location 1,101002,BACON & EGGS,9.09,1.0000,9.09,3.0000,BREAKFAST,
Location 1,101010,JAM & TOAST,4.55,1.0000,4.55,1.2000,BREAKFAST,
Location 1,106001,DUCK,12.72,1.0000,12.72,7.6000,ENTRÉE,
Location 1,106002,BEEF,11.82,1.0000,11.82,6.2500,ENTRÉE,
Location 1,106003,LAMB,10.91,1.0000,10.91,5.8000,ENTRÉE,
Location 1,106007,PASTA,10.00,1.0000,10.00,2.5000,ENTRÉE,
Location 1,202001,CAPPUCCINO,3.18,1.0000,3.18,0.2942,COFFEE,
Location 1,202002,FLAT WHITE,3.18,1.0000,3.18,0.2942,COFFEE,
Location 1,202004,SHORT BLACK,2.73,1.0000,2.73,0.2042,COFFEE,
Location 1,210002,HAHN LIGHT SCH,5.00,1.0000,5.00,1.6170,SCHOONERS,
Location 1,210003,CARLTON MID SCH,5.45,1.0000,5.45,1.9730,SCHOONERS,
Location 1,210004,XXXX GOLD SCH,5.45,1.0000,5.45,1.9502,SCHOONERS,
Location 1,210006,CARLTON DRAUGHT SCH,6.36,1.0000,6.36,2.6460,SCHOONERS,
Location 1,210007,TOOHEYS NEW SCH,6.36,1.0000,6.36,2.4539,SCHOONERS,
Location 1,210009,VB SCH,6.36,1.0000,6.36,2.4207,SCHOONERS,
Location 1,210012,XXXX BITTER SCH,6.36,1.0000,6.36,2.4257,SCHOONERS,
To configure and use the Stock Item Totals Export, configure as follows:
The Automatic Export will be triggered as per the Export Daily at time/or every # minutes.
An export file will be produced as per the example shown above.
This Export Format will export Customer Sales Totals in a format similar to the example shown below:

The below is a text copy of the sample Exported Data shown in the above screenshot:
LOCATION,CUSTOMERCODE,CUSTOMERNAME,CUSTOMERTYPE,SALESCATEGORY,DEPARTMENT,STOCKCODE,STOCKDESCRIPTION,UNIT_PRICE_EX,UNIT_TAX,UNIT_PRICE_INC,QUANTITY,NETT_SALES_EX,TAX,NETT_SALES_INC,DISCOUNTS,GROSS_SALES_INC,UNIT_COST_OF_SALES,TOTAL_COST_OF_SALES,GROSS_PROFIT
Location 1,2,Sarah Charlton,MEMBERS,BEVERAGE,COFFEE,202001,CAPPUCCINO,3.18,0.32,3.50,2.0000,6.36,0.64,7.00,0.00,7.00,0.5884,0.5884,5.7752
Location 1,2,Sarah Charlton,MEMBERS,BEVERAGE,COFFEE,202002,FLAT WHITE,3.18,0.32,3.50,2.0000,6.36,0.64,7.00,0.00,7.00,0.5884,0.5884,5.7752
Location 1,2,Sarah Charlton,MEMBERS,BEVERAGE,COFFEE,202004,SHORT BLACK,2.73,0.27,3.00,2.0000,5.45,0.55,6.00,0.00,6.00,0.4084,0.4084,5.0444
To configure and use the Stock Item Totals Export, configure as follows:
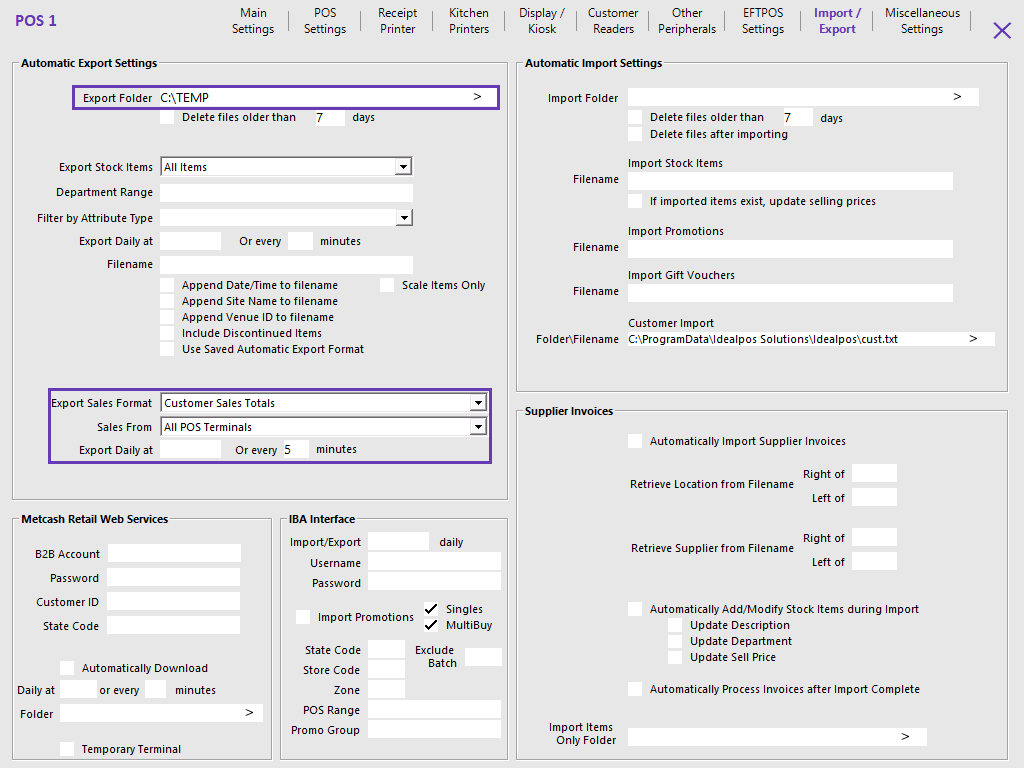
The Automatic Export will be triggered as per the Export Daily at time/or every # minutes.
An export file will be produced as per the example shown above.
CODE, LASTNAME, FIRSTNAME, MIDDLENAME, TITLE, ADDRESS1, ADDRESS2, SUBURB, STATE, POSTCODE, PHONE, MOBILE, FAX, EMAIL, GENDER, COMPANY, OCCUPATION, MARITALSTATUS, DOB, DOB2, NEXTOFKIN, CONTACTNO, COMMENTS1, COMMENTS2, TYPE, PASSWORD, MAILOUT, ACCOUNT, CREDITLIMIT, PRICELEVEL, ABN, POINTS, SCAN, SALESPROMPT, UDTEXT1, UDTEXT2, UDTEXT3, UDTEXT4, UDTEXT5, UDTEXT6, UDTEXT7, UDTEXT8, UDTEXT9, UDTEXT10, UDYESNO1, UDYESNO2, UDYESNO3, UDYESNO4, UDYESNO5, TYPEDESCRIPTION.
Below is a visual example of the text file that will be created by the export.
This function enables all new and modified items to be exported to a Digi Scale Software format.
Code, ScanCode, Price1, Description, WeightType
Price will be overwritten with any current Special Prices otherwise Price 1 is used.
WeightType is 1 for Fixed Price items, 2 for items with KG or LB in the Unit field.
Go to Setup > POS Terminals > Modify > Import/Export > Automatic Export Settings > Export Stock Items: Digi Scale Export.
This section is used for configuring the automatic import of data into Idealpos.
The types of data that can be imported automatically are Stock Items, Promotions and Gift Vouchers.
Refer to the sections below for further information.
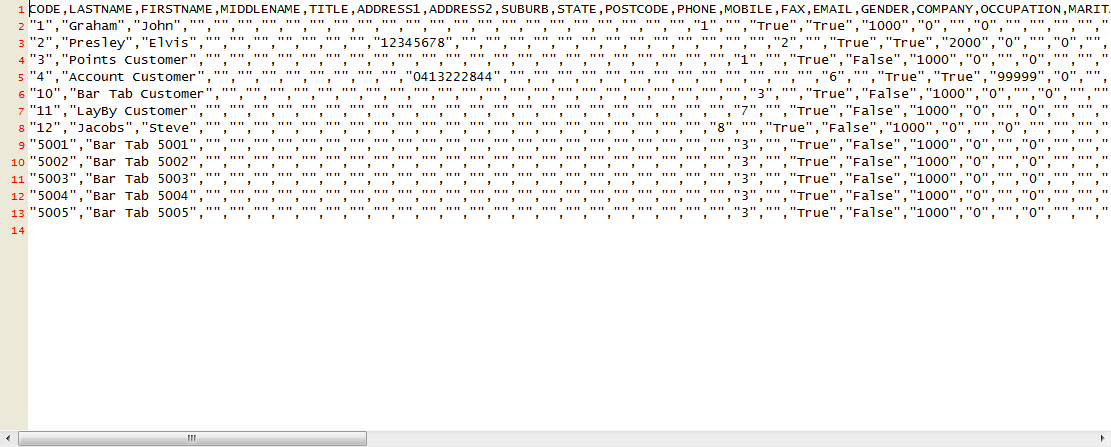
For information about Automatic Customer Import functionality, refer to the Importing Customers page within the Customers topic.
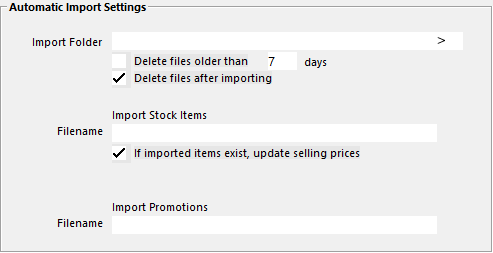
Browse to a location on your network or PC where you would like the export to be saved to, or where the Import will be pulled from.
Delete files older than # days - To delete files older than a specified number of days, enable the checkbox and specify the number of days that you want files deleted from the Import folder.
Delete files after Importing - To delete files after they have been imported into Idealpos, enable this checkbox.
Note regarding Delete files after Importing!
If the "Delete files after Importing" option is unchecked/disabled, the file can only be imported once using the filename that is specified in the Filename field.
E.g. After a Promotion or Gift Voucher file has been imported once using the Filename specified in the Import Promotions/Import Gift Vouchers Filename field, the Filename will need to be manually changed to another Filename (that hasn't been used previously) so that another automatic import can be processed.
Attempting to use a previously used Filename will not trigger the Automatic Import of the file.
If the "Delete files after Importing" option is checked/enabled, this restriction does not apply and a file with the same filename can be imported as many times as required.
This function allows for a large amount of Stock Items to be automatically imported as soon as the file is present.
This usually happens within about a minute of the file being placed in the folder.
Enter the name of the file you want to import.
If Imported items exist, update selling prices - Enable this checkbox to update Selling Prices if the Imported Items already exist in the system.
This function enables the automatic import of Promotions as soon as the file is present.
Enter the filename of the promotions file that you want to import.
The file format/filename extension supported for promotions is CSV or TXT; ensure that you specify the filename extension within the filename field.
In order for the promotions file to be imported successfully, the data within the file needs to be formatted as per the format that is outlined on the Import Promotions page.
An example of an Import Promotions Filename would be 'PROMO.TXT', 'PROMO.CSV'.
When a file matching this filename is dropped into the Import Folder location, it will be processed and imported automatically by Idealpos.
This function enables the automatic import of Gift Vouchers as soon as the file is present.
Enter the filename of the Gift Vouchers file that you want to import.
For the Gift Vouchers to be imported successfully, the data within the file needs to be formatted as per the format that is outlined in the Gift Vouchers section of the Format of Import Files page.
An example of an Import Gift Vouchers Filename is 'IMPORTGIFTVOUCHERS.TXT' or 'IMPORTGIFTVOUCHERS.CSV'.
When a file matching the Filename in the Import Promotions Filename is dropped into the IMport FOlder location, it will be processed and imported automatically by Idealpos.
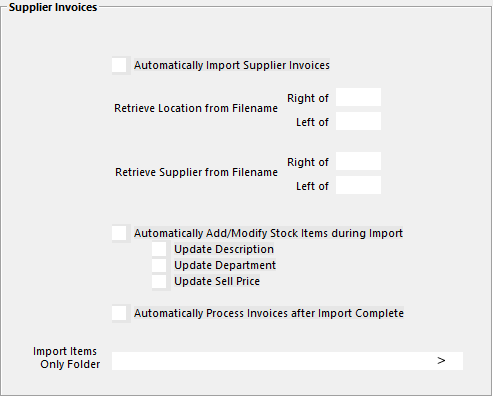
This function is used to configure the importing of Supplier Invoices into Idealpos.
Automatically Import Supplier Invoices - Enable this checkbox to automatically Import Supplier Invoices into Idealpos.
Supplier Invoices will be imported from the Import Folder location that has been configured in the Import Folder under Automatic Import Settings.
Retrieve Location from Filename: Most Invoice filenames will consistently have a similar filename format where the Location and Supplier will reside in the same place within the filename.
Therefore, the below settings can be used to configure Idealpos so that it will retrieve the Location and Supplier from the Invoice filename.
Example Filename: BCM - ABC Inv 12345.xlsx
In this filename, the Location is BCM and the Supplier is ABC.
So in order to retrieve these details from the filename, we need to configure the settings as follows (note that any setting listed below without a value is simply a field that has been left blank and also take note of settings which contain a hyphen "-").
Retrieve Location from Filename - Right of:
Retrieve Location from Filename - Left of: -
Retrieve Supplier from Filename - Right of: -
Retrieve Supplier from Filename - Left of: Inv
If a Supplier is linked to the Generic2 type, the below rules will apply when importing Stock Items from an Invoice via the Import Items Only Folder.
If the Supplier is linked to the Generic type, then the Description, Department and Price 1 are updated regardless.
Update Description: If a Stock Item is imported via the "Import Items Only Folder" and this checkbox is enabled, then the description will be overwritten by what is in the invoice.
Update Department: If a Stock Item is imported via the "Import Items Only Folder" and this checkbox is enabled, the Stock Item Department will be updated with what is in the invoice.
Update Sell Price: If a Stock Item is imported via the "Import Items Only Folder" and this checkbox is enabled, the Stock Item Sell Price will be updated with what is in the Invoice.
Note that if a POS Terminal is locked to a specific Price Level, only the locked Price Level will be modified, otherwise all Price Levels will be set to the Imported Price.
Automatically Process Invoices after Import Complete: Enable this checkbox to Automatically Process Invoices after the Import is completed. If this is option is unchecked, invoices can be manually processed by going to Transactions > Stock Control > Stock Purchases
Import Items Only Folder: This function is used when you only want to import items from an invoice without processing the invoice itself. Place the invoice into the location that is configured in this setting, then Idealpos will skip the importing of the Invoice and will only import the items from the Invoice.
This function allows you to set the Sales Export Time for Liquology.
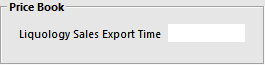
Note that the PriceBook Interface can also be used to Import Special Prices.
In order to use the PriceBook function to import Special Prices, the Liquorfile module needs to be added to the licence.
See PriceBook Interface - Import Special Prices for more information about using this function.
This function allows you to configure Idealpos to download invoices from Metcash Retail Web Services (such as ALM v8 XML Invoices).
The entire process for configuring this functionality is outlined in the ALM v8 XML section within the Stock Purchases topic.
Enter the credentials supplied by Metcash into the following fields:
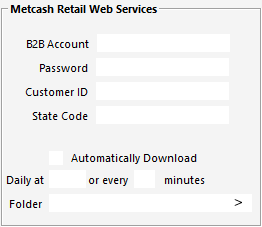
Note!
Once an invoice has been downloaded from Metcash Retail Web Services, it will be marked as being downloaded on the Metcash servers and will not download a second time.
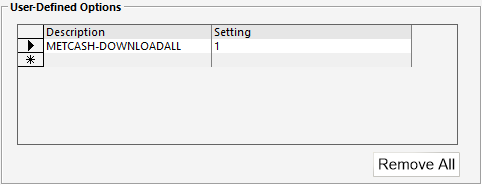
If all Metcash Invoices need to be re-downloaded for any reason, the User-Defined Option outlined below can be created.
Warning!
Creating this User Defined Option should only be done temporarily and will result in ALL PREVIOUSLY DOWNLOADED INVOICES BEING RE-DOWNLOADED AGAIN FROM METCASH RETAIL WEB SERVICES!
All previously downloaded invoices will be re-downloaded at the interval configured (Daily at HH:MM or every X minutes).
Use caution when using this User-Defined Option!
Go to: Back Office > Setup > POS Terminals > Select POS Terminal > Modify > POS Settings tab > User-Defined Options:
Description: METCASH-DOWNLOADALL
Setting: 1
This functionality is only available for use when the IBA module is enabled in the Licence Gateway for the POS Terminal.
Note!
When using the IBA Interface, the output folder for exported data is hard-coded as:
ProgramData\Idealpos Solutions\Idealpos\IBA
Go to Setup > POS Terminals > Modify > Import/Export > IBA Interface.

Daily Import/Export Time: Enter the time to perform the function in 00:00 format.
Username: IBA will issue you a username.
Password: IBA will issue you a password.
Import Promotions: Select to have the promotions imported. If an IBA Promotion is imported that contains promotions which already exist in Idealpos, those promotions in Idealpos will be overwritten (e.g. if a Promotion file is imported with a set of Promotion Start Dates/End Dates, Prices, etc. then another IBA Promotion file with the same promotions but different Start Dates/End Dates/Prices is reimported again, those changes will overwrite the existing promotion records in Idealpos).
State Code: Enter the code given by IBA.
Store Code: Enter the code given by IBA.
Zone: Enter the details given by IBA.
POS Range: Enter the range of POS terminals the promotions will affect. E.g. 1,3,5-7, 10.
Promotion Group: Enter the Promotion Group used in Idealpos.
Exclude Batch: Allows you to exclude specific zone areas when importing promotion files from IBA. You need to add the characters that designate which zone areas you want to exclude. You can exclude from either Z1, Z2 or any other zone areas specified by IBA. If you need to exclude multiple zone areas/batches, this can be done by listing the areas you want to exclude separated by a semicolon. E.g. Z1;Z2. This field can also be used to exclude Promotion Program Groups (e.g. PLAT to exclude Platinum Program Promotions).